
There are many different pouring activities - they build on each other in terms of difficulty level and variation.
They offer children the opportunity to practice movements and improve their hand-eye coordination.

<< Amazon-(Affiliate)-Links [respectively the whole Amazon cart] will provide a small percentage – without additional cost to you! >> therefore we have to mark this article as #ad ;-) . <<
Introduction
There are two types of pouring activities. Pouring solid material and pouring water. These works are always presented on a tray and the objects should be placed in writing direction.
The introduced activities can of course be offered with various materials for pouring. I tried to rate them in their level of difficulty.
Notes:
- Please note, that you should just put the right amount of rice or water in the container, to provide a control of error and the possibility to experience volume, especially if the contents are divided between more than one container.
- The pouring material should be conform with the age of the child and the developmental stage - if the child is still in the oral phase, pouring materials should be used that are safe. Or it can be seen as a sign that there might not be too much interest in pouring exerices but rather being eager to self pouring a cup of water to drink.
- To acknowledge the Montessori Principle of Isolation of quality, the materials for pouring should be homogenous - one single color. (unfortunately I had no undyed corn left for the photo)
Pouring with solid material you can find a video with an presentation on YouTube
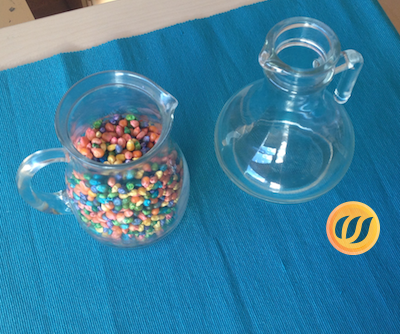
Pouring with transparent pitchers is the easiest form of a pouring exercise, because the child has good visual control of the amount, they are pouring.
Required materials
- 2 transparent pitchers the same size
- grains or other pouring material

Pouring with non-transparent pitchers, this is the next level of pouring with solid materials. Here the child has little visual control over the pouring material.
Required materials
- 2 non-transparent pitchers the same size
- grains or other pouring material
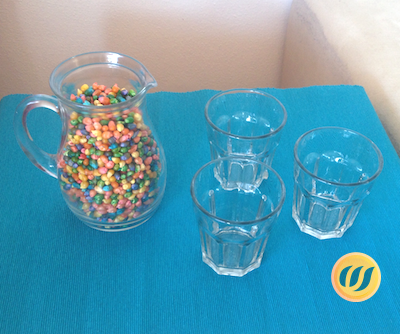
Pouring from a transparent pitcher, in the third stage the pouring material is divided between three transparent cups. It is important that the material is exactly enough for the cups.
Required materials
- 1 big, transparent pitcher
- 2-4 glasses or cups
- grain or other pouring material
Pouring exercises with water (to make the control of error easier the water can be coloured with food dye) You will find a video on how to present it on YouTube
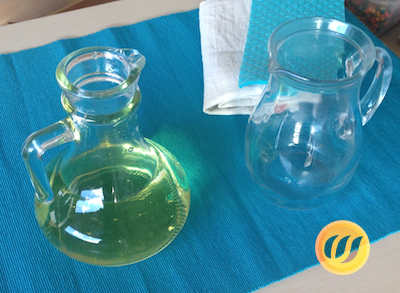
Pour water from one pitcher in the other. The shape of the spout provides different levels of difficulty.
Required materials
- 2 transparent pitchers the same size
- Water (possibly food coloring)
- Sponge cloth and towel

Pouring water from one pitcher into an other. The next stage up in which the child has less visual control over the pouring material.
Required materials
- 2 non-transparent pitchers the same size
- Water (possibly food coloring)
- Sponge cloth and towel

Pouring water from a transparent pitcher, in the third stage the water is divided between three cups. It is important that the amount of water fits exactly into the cups.
Required materials
- 1 big, transparent pitcher
- 2-4 glasses
- Water (possibly food coloring)
- Sponge cloth and towel

Pouring from a nontransparent pitcher, in the fourth stage the water is divided into two nontransparent cups. It is important that the amount of water fits exactly into the two cups.
Required materials
- 1 tea pod
- 2 tea cups
- Water (possibly food coloring)
- Sponge cloth and towel
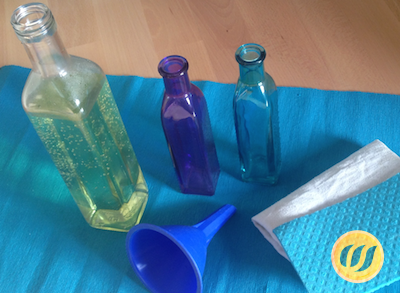
Divide water with a funnel into two different bottles. Choose the smaller bottles in a way that the amount of water from the larger bottles fits exactly into the smaller ones.
Required materials
- 1 big bottle with a tight neck
- 2 small bottles with a tight neck
- 1 fitting funnel
- Water (possibly food coloring)
- Sponge cloth and towel
Next step: deepening knowlegde, following interests:
- Interests: Filling and pouring
- Skills: Hand-Eye-Coordination Perception Independence
- Type of play: Practical life
- Sensitive period: Sensitivity for Order Sensitivity for Movement